About midway through the first day of shooting, the coach noticed that one of his shooters was looking on the ground intently, as if searching for something. During the break he approached the student. “What’s up?” The shooter by this time was on his knees in the grass. Looking up, the man in question held up his hand, in it was a red dot optic that had once been attached to the slide of his pistol. “Found it.”
This incident wasn't the first time that screws had come loose and an optic had fallen off during training, and it definitely wouldn't be the last. However, you don't have to submit to the fate of screws backing out and your accessories falling off.
Red Dot Mounting
If there is a legitimate downside or Achilles heel to red dots on pistols versus good old iron sights, it's the requirement to use threaded screws to secure either the special mounting plate and/or the optic itself to the pistol slide. You have a 21st century optical gunsight being held to the pistol slide with a couple of little threaded screws that have been around for 400 years.
Several years ago, before optic-ready pistols were coming from the factory, the preferred way to mount an optic on a slide was to have the slide custom machined and the mounting holes tapped for the specific optic footprint. That worked well because the optic was directly seated on the slide and only two screws were required. However, that method took time and wasn't cheap.
Nonetheless, as handgun makers saw the need to sell their pistols as “optic-ready” guns, they had a problem. There were three or four major footprint patterns for pistol optics and gun makers had no idea which ones would be the most popular or desired by their customers. The idea of making four different slide SKUs for the same pistol was cost prohibitive, so they came up with mounting plate kits.
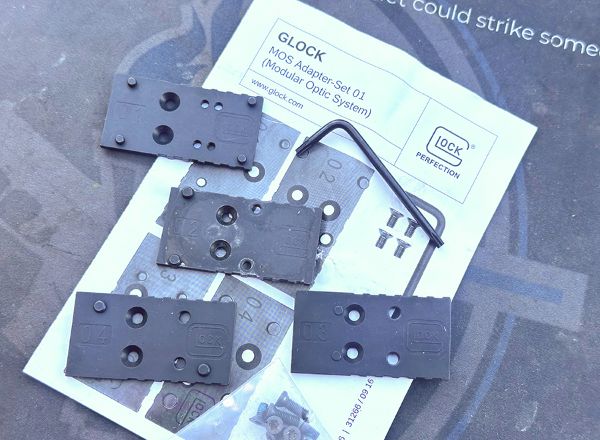
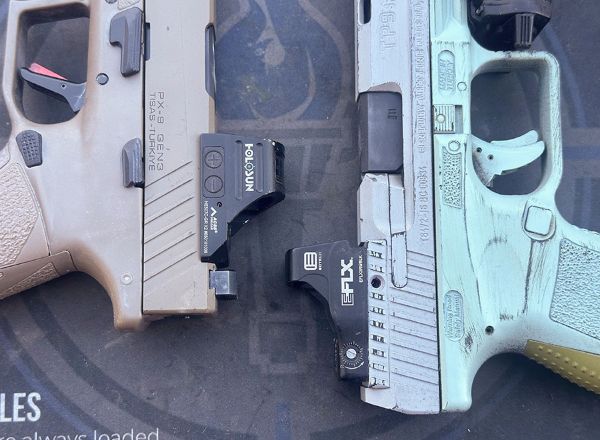
For instance, if you were to purchase a GLOCK Gen 4 or Gen 5 “MOS” (modular optic system) pistol, you'd receive a 4-pack of mounting plates numbered “01” to “04” that would allow you to install optics that had the Docter/Meopta, Trijicon, C-More, or Leupold footprints.
Naturally, all the other gunmakers followed suit and either provided a plate kit with their optic-ready pistols or had the option to let you just purchase one plate for the specific optic you might choose later.
The problem with the one-size-fits-all, optic-ready slide cuts was twofold. First, threaded screws are held in place by friction and will always work loose over time due to the continuous recoil of the gun. Modern pistol makers have long since gotten away from the use of threaded screws in the gun designs. Think about it. How many threaded screws does the original GLOCK 17 use? The answer is: zero (if using factory sights). Not using threaded screws was a deliberate choice.
Two Screws or Four?
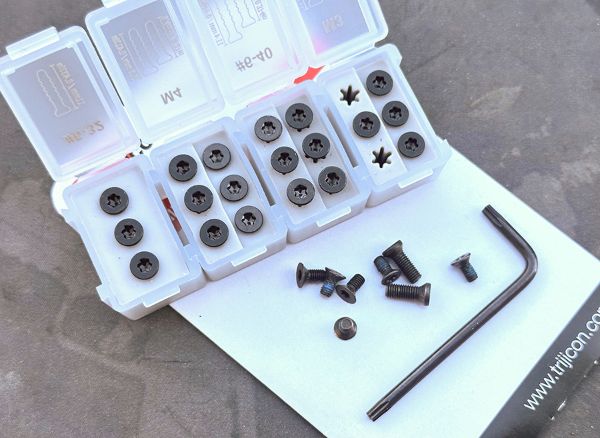
When you mount an optic directly to the slide you have two screws. When you use a mounting plate you now have four screws, essentially doubling your potential failure points. Also, these screws are small and relatively shallow when inserted. You might have three or four threads total making contact with the tapped screwhole. That is not much mechanical strength to hold the optic in place for tens of thousands of slide reciprocations both manual and under recoil.
There are two primary methods used to keep screws in firearms from backing out inadvertently over time. The first is staking the screws after they have been properly torqued in place. Staking, such as is done on the gas-key screws of an AR-15 or the castle nut of the same gun, is a physical and purposeful deformation of the metal surrounding the screw and the screw itself to prevent it from backing out. Most folks aren't likely to go the semi-permanent route of staking the screws on their optics and/or mounting plates.
The second, more preferable, method is to use some type of threadlock compound on the screw threads. Most professional gun and accessory makers will pre-dip the screws in a blue-colored threadlocker. The amount of such material on the screws will vary. This is nice and I appreciate it, but I always add a little bit more threadlocker than what came from the factory.
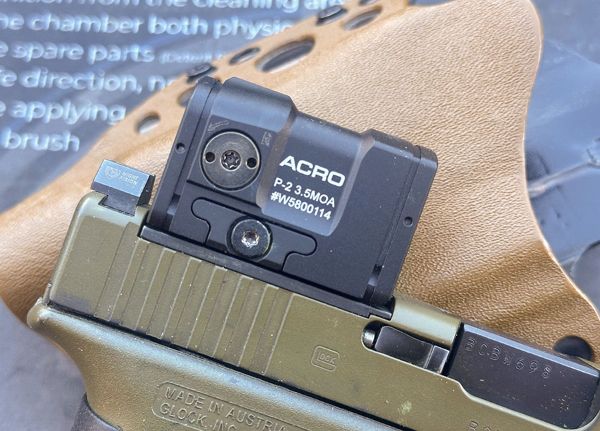
While the trend now is to eliminate the need for mounting plates, such as we see with the GLOCK Gen 6 pistols, there are optics that require the use of a mounting plate, such as the Aimpoint ACRO.
*Author’s Note: if there is any chance at all that there could be lubricant on the screws or in the screw holes, take a cotton swab and some isopropyl alcohol and clean the threads and holes. If you have mineral spirits in your shop, you can dip your cotton sway in that material and clean the threads. Then let everything dry before installing the screws with the threadlocking compound. If there's petroleum-based lubricant on any of the threads, it will counterattack the bonding property of the threadlocker. Wait at least twenty-four hours for the threadlockers to set before shooting the gun.
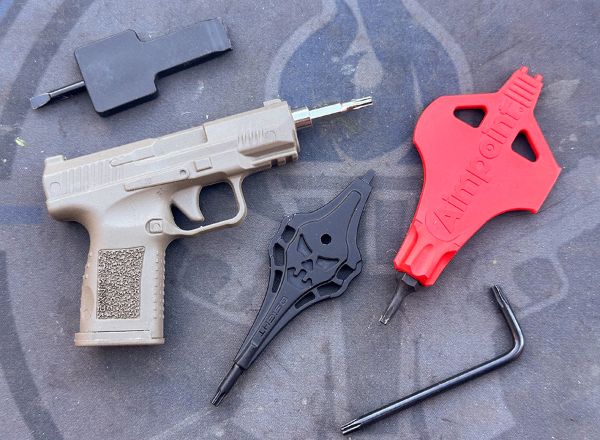
A Legitimate Torque Driver
In addition to threadlocker, it's highly recommended that you use some type of torque driver with measurable torque in “inch-pounds” not “foot-pounds.” Readers of this article who have gorilla-hands take note. The small mounting screws for red dots and base plates can and will break under too much pressure. Snapping the head off of a mounting screw is going to most assuredly ruin your day.
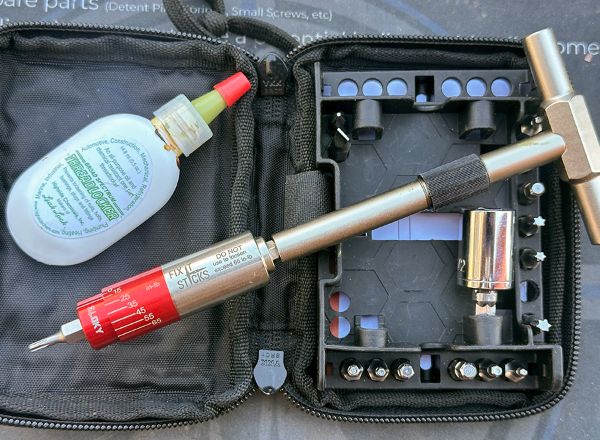
I have both a "Fat Wrench" and a set of “Fix It Sticks.” Both have inch-pound torque settings. For the correct amount of torque, you need to know what type of screws you are using, both the material and the design. For instance, for steel M4 screws going into steel base threads, the recommended torque is 16-23 inch pounds. I would split the difference and go with 20 inch pounds.
All of your sights will likely come with Allen wrenches or some specially designed tool for securing the screws. These are nice and I would definitely keep them. However, if you are serious about your shooting, securing the screws with an appropriate torque driver should be seen as a non-negotiable procedure when you install your optic.
Speaking of installation, if you purchase a pistol/optic combination where the sight is already screwed to the gun, again, that is nice. Regardless, unless you can speak to the person who installed the optic on the pistol face-to-face and ask him about the torque specs, I would highly suggest that you remove the screws, apply your own threadlocker, and then torque them down to the correct specifications.
Of course the choice is yours. You can ignore the aforementioned advice and just hope and pray that your optic doesn’t come off while you are shooting. It’s up to you.
– Paul Markel, Shooting News Weekly
Paul G. Markel is a combat decorated United States Marine veteran. He is also the founder of Student the Gun University and has been teaching Small Arms & Tactics to military personnel, police officers, and citizens for over three decades.